My Sites


Forums


Friday, June 16, 2017
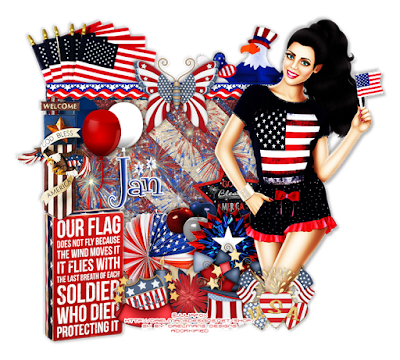
Daelmans Designs ~ US of A
This
tutorial is of my own creation and any resemblance, or likeness, to any
other tut is purely coincidental. This tutorial is for personal use
only; any use for monetary gain is illegal.
Supplies:
Program: Photoshop Elements 13 (other versions may work)
Tube of choice: Summer Girl by Julia Fox. This tube comes with the kit.
PTU Kit: US of A by Daelmans Designs at Daelmans Designs, Digi Divas, Low Budget Scrapping, & Digi Graphic Designs
Font: Fontdinerdotcom Sparkly
Open:
Frame 2
Paper 1
Element 45
Element 103
Element 113
Element 92
Element 73
Element 70
Element 68
Element 71
Element 90
Element 59
Element 30
Element 98
Element 111
Element 108
Element 16
Element 95
Tube of choice
Tutorial
Paper 1: Place behind frame 2 --> resize to fit inside frame
Name:
Paper 1
Element 45
Element 103
Element 113
Element 92
Element 73
Element 70
Element 68
Element 71
Element 90
Element 59
Element 30
Element 98
Element 111
Element 108
Element 16
Element 95
Tube of choice
Tutorial
Frame 2: Open --> shift+D (or re-save as a new file if using photoshop)
Paper 1: Place behind frame 2 --> resize to fit inside frame
Element 45: Resize 75% --> place behind paper and frame --> position upper left
Element 103: Resize 75% --> place behind paper and frame -->position upper right
Element 113: Resize 45% --> place between paper and frame --> duplicate x2 --> position to your liking
Element 92: Resize 45% --> place above frame 2 --> position in the center on the right side
Element 73: Resize 75% --> place above element 92 --> position upper left corner of frame 2
Element 70: Resize 45% --> place above element 73 --> position diagonally down left of element 92
Element 68: Resize 30% --> place above element 70 --> position between elements 92 and 70
Element 71: Resize 45% --> place above element 68 --> position diagonally down right of element 68
Element 90: Resize 75% --> place above element 71 --> position on bottom left side of frame 2
Element 59: Resize 40% --> place above element 90--> position bottom center of frame 2
Element 30: Resize 50% --> place above element 59--> position to the right of element 59
Element 98: Resize 40% --> place above element 30--> position between elements 90 and 59
Element 111: Resize 45% --> place above element 98--> position left side of frame 2
Element 108: Resize 75% --> place above element 111--> position top of frame 2
Element 16: Resize 50% --> place above element 108 --> position top of frame 2 btwn eles 45 & 108
Tube of choice: Resize to your liking --> place above element 16 --> position right side of frame 2 --> duplicate x3 --> hide original tube layer --> add desired drop shadow on 1st duplicate layer --> apply plugin of choice on 2nd duplicate layer (I used Xero Radiance)--> change "normal" to "overlay" for 3rd duplicate layer

Element 95: Resize 45% --> place above tube of choice--> position over the bottom portion of the legs of the tube
Element 103: Resize 75% --> place behind paper and frame -->position upper right
Element 113: Resize 45% --> place between paper and frame --> duplicate x2 --> position to your liking
Element 92: Resize 45% --> place above frame 2 --> position in the center on the right side
Element 73: Resize 75% --> place above element 92 --> position upper left corner of frame 2
Element 70: Resize 45% --> place above element 73 --> position diagonally down left of element 92
Element 68: Resize 30% --> place above element 70 --> position between elements 92 and 70
Element 71: Resize 45% --> place above element 68 --> position diagonally down right of element 68
Element 90: Resize 75% --> place above element 71 --> position on bottom left side of frame 2
Element 59: Resize 40% --> place above element 90--> position bottom center of frame 2
Element 30: Resize 50% --> place above element 59--> position to the right of element 59
Element 98: Resize 40% --> place above element 30--> position between elements 90 and 59
Element 111: Resize 45% --> place above element 98--> position left side of frame 2
Element 108: Resize 75% --> place above element 111--> position top of frame 2
Element 16: Resize 50% --> place above element 108 --> position top of frame 2 btwn eles 45 & 108
Tube of choice: Resize to your liking --> place above element 16 --> position right side of frame 2 --> duplicate x3 --> hide original tube layer --> add desired drop shadow on 1st duplicate layer --> apply plugin of choice on 2nd duplicate layer (I used Xero Radiance)--> change "normal" to "overlay" for 3rd duplicate layer
Element 95: Resize 45% --> place above tube of choice--> position over the bottom portion of the legs of the tube
-Photoshop Elements13
-Font of choice (mine is Fontdinerdotcom Sparkly so these settings work for my font. you may need to alter slightly for yours)
-layer --> layer style --> style settings
drop shadow: 30 deg angle; 4, 4, 75%; black
stroke: 2, 100, #ffffff
bevel: 3px, up
font color: #1d3ea5
bevel: 3px, up
font color: #1d3ea5
Add copyright and watermark

Saturday, June 10, 2017
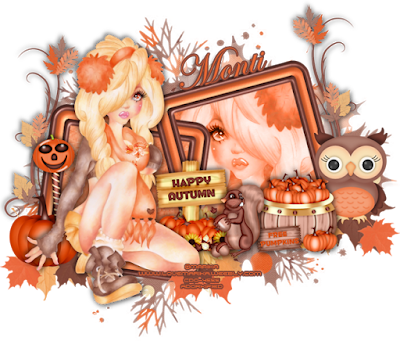
Monti's Scraps ~ Happy Autumn
This
tutorial is of my own creation and any resemblance, or likeness, to any
other tut is purely coincidental. This tutorial is for personal use
only; any use for monetary gain is illegal.
Supplies:
Program: Photoshop Elements 13 (other versions may work)
Tube of choice: Individual Tube 12-2 by Marika. You must have a license to use her tubes.
PTU Kit: ScrapMonti_IB-Marika-12-2 by Monti's Scraps at Creative Design Outlet
Font: Edwardian Script (system font)
Mask: DD Fall Mask 8
Mask: DD Fall Mask 8
Open:
Frame 1
Paper 2
Paper 4
Element 1
Element 2
Element 4
Element 14
Element 17
Tube of choice
Tutorial
Paper 4: Place behind frame 1 --> duplicate --> resize original to fit in the right square --> select the frame layer --> magic wand --> select inside the right square --> select --> modify --> expand --> choose your desire settings --> ctrl+shift+I --> select the original paper layer --> hit delete
Name:
Paper 2
Paper 4
Element 1
Element 2
Element 4
Element 14
Element 17
Tube of choice
Tutorial
Frame 1: Open --> re-save with a different name
Paper 4: Place behind frame 1 --> duplicate --> resize original to fit in the right square --> select the frame layer --> magic wand --> select inside the right square --> select --> modify --> expand --> choose your desire settings --> ctrl+shift+I --> select the original paper layer --> hit delete
(repeat process for the duplicate paper layer)
Tube of choice: Place closeup of tube behind frame 1 --> select the frame layer --> magic wand --> select inside the right
square --> select --> modify --> expand --> choose your
desire settings --> ctrl+shift+I --> select the original paper
layer --> hit delete
Element 14: Paste onto tag --> resize to your liking --> place behind paper layer on the left side --> duplicate --> copy & paste duplicate as a new image --> image --> rotate --> flip horizontally --> place onto tag opposite side of the original element
Element 2: Paste onto tag --> resize to your liking --> place on the left side on top of the pumpkin
Element 4: Paste onto tag --> resize to your liking --> place in the center of the frame
Tube of choice (again): Paste onto tag --> resize to your liking --> position in the center of the left square
Element 1: Paste onto tag --> resize to your liking --> position to the right slightly to the left of the owl
Element 17: Paste onto tag --> resize to your liking --> position between elements 4 & 1
Mask: I used paper 2 and DD Fall Mask 8 by De
-Photoshop Elements13
-Font of choice (mine is Edwardian Script so these settings work for my font. you may need to alter slightly for yours)
-layer --> layer style --> style settings
drop shadow: 30 deg angle; 4, 4, 75%; black
stroke: 2, 100, #7d4136
font color: #ec6932
font color: #ec6932
Add copyright and watermark
Sunday, June 4, 2017
Monti's Scraps ~ Steampinked

This
tutorial is of my own creation and any resemblance, or likeness, to any
other tut is purely coincidental. This tutorial is for personal use
only; any use for monetary gain is illegal.
Supplies:
Program: Photoshop Elements 13 (other versions may work)
Tube of choice: Jaclyn by Alehandra Vanhek (exclusive). You must have a license to use his tubes.
PTU Kit: ScrapMonti_SteamPinked by Monti's Scraps at Creative Design Outlet
Plugins: Xero (Porcelain) ~ If this download doesn't work then let me know.
Font: Steamwreck
Open:
Frame 4
Paper 2
Element 3
Element 4
Element 9
Element 18
Element 20
Element 22
Element 34
Element 36
Element 40
Element 45
Element 50
Element 62
Element 64
Element 80
Element 80
Tube of choice
Tutorial:
Frame 4: Open --> re-save with a different name
Paper 2: paste behind frame 4 --> magic wand tool --> rectangle tool --> cover the bottom areas of the frame --> select --> modify --> expand --> choose the px to expand on --> ctrl + shift + i --> delete
Element 3: image --> rotate 90° left --> resize to your liking --> position in upper left side of the frame --> put behind paper 2
Element 62: resize to your liking --> place in front of frame 4 --> position right hand corner
Element 34: rotate 30° right --> resize to our liking --> duplicate --> place one copy in front of element 62 --> place the duplicate layer at the bottom of the frame --> position slightly off center
Tube of choice: recolor (if possible) to match the kit --> place close up of tube in front of paper 2 --> magic wand tool --> rectangle tool --> cover the bottom areas of the frame --> select --> modify --> expand --> choose the px to expand on --> ctrl + shift + i --> delete.
Tube of choice (again): resize to your liking --> place above frame 4 on the right side --> duplicate x2 --> hide layers for now
Xero plugin (PSP): these settings work for the tube that I used

Element 9: image --> rotate --> flip horizontal --> resize to your liking --> place behind tube of choice on the right side
Element 20: resize to your liking --> place above element 9 --> position lower right hand side of frame 4
Element 22: resize to your liking --> place above element 20 --> position upper portion of element 20
Element 40: rotate 50° left --> resize to your liking --> rectangular marquee tool --> select the heart vine --> ctrl + x --> position on the left side
Element 50: resize to your liking --> place above element 40 --> position at the lower left side of frame 4 --> place bottom left
Element 4: resize to your liking --> place above element 20 --> position bottom right
Element 64: resize to your liking --> place to the left of frame 4 --> position close to the close up of the tube
Element 34 (duplicate): place above element 4 --> position slightly lower than element 4
Element 36: resize to your liking --> place above element 34 duplicate --> position bottom lower center
Element 80: resize to your liking --> place above element 36 --> position bottom left portion of element 36
Element 18: resize to your liking --> place above element 80 --> position bottom left slightly off center of element 80
Element 45: resize to your liking --> place behind element 18 --> position to your liking (like the rose is sitting in the boot)
Element 62: resize to your liking --> place in front of frame 4 --> position right hand corner
Element 34: rotate 30° right --> resize to our liking --> duplicate --> place one copy in front of element 62 --> place the duplicate layer at the bottom of the frame --> position slightly off center
Tube of choice: recolor (if possible) to match the kit --> place close up of tube in front of paper 2 --> magic wand tool --> rectangle tool --> cover the bottom areas of the frame --> select --> modify --> expand --> choose the px to expand on --> ctrl + shift + i --> delete.
Tube of choice (again): resize to your liking --> place above frame 4 on the right side --> duplicate x2 --> hide layers for now
Xero plugin (PSP): these settings work for the tube that I used
Element 9: image --> rotate --> flip horizontal --> resize to your liking --> place behind tube of choice on the right side
Element 20: resize to your liking --> place above element 9 --> position lower right hand side of frame 4
Element 22: resize to your liking --> place above element 20 --> position upper portion of element 20
Element 40: rotate 50° left --> resize to your liking --> rectangular marquee tool --> select the heart vine --> ctrl + x --> position on the left side
Element 50: resize to your liking --> place above element 40 --> position at the lower left side of frame 4 --> place bottom left
Element 4: resize to your liking --> place above element 20 --> position bottom right
Element 64: resize to your liking --> place to the left of frame 4 --> position close to the close up of the tube
Element 34 (duplicate): place above element 4 --> position slightly lower than element 4
Element 36: resize to your liking --> place above element 34 duplicate --> position bottom lower center
Element 80: resize to your liking --> place above element 36 --> position bottom left portion of element 36
Element 18: resize to your liking --> place above element 80 --> position bottom left slightly off center of element 80
Element 45: resize to your liking --> place behind element 18 --> position to your liking (like the rose is sitting in the boot)
-Photoshop Elements13
-Font of choice (mine is Steamwreck so these settings work for my font. you may need to alter slightly for yours)
-layer --> layer style --> style settings
drop shadow: 30 deg angle; 4, 4, 75%; black
stroke: 2, 100, #634c46
font color: #d1b8bb
font color: #d1b8bb
Add copyright and watermark
Subscribe to:
Posts
(Atom)
My Blinkies