My Sites


Forums


Wednesday, May 7, 2014
Rissa's Designs ~ School Nerd
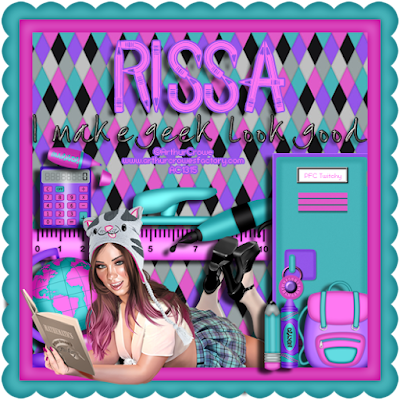
This tutorial is of my own creation and any resemblance, or likeness, to any other tut is purely coincidental. This tutorial is for personal use only; any use for monetary gain is illegal.
Supplies:
Program: Paint Shop Pro X5 and Photoshop Elements 9 (other versions should work)
Tube of choice: Kitty Babe School by Arthur Crowe. You must have a license to use his tubes.
PTU Kit: School Nerd by Rissa's Designs
Font: Back to School
Tutorial:
-Open frame 2 --> shift+D (or re-save as a new file if using photoshop)-Open paper 4 --> ctrl+a --> copy+paste --> place onto tag below frame --> re-size to your liking
-Open wordart 1 --> image --> re-size --> change to 41% --> copy+paste onto tag --> place at the top in the middle
-Open locker --> image --> re-size --> change to 55% --> copy+paste onto tag --> place at the left side of the tag
-Open backpack --> image --> re-size --> change to 23% --> copy+paste onto tag --> place at the left side of the tag above the locker
-Open crayon --> image --> re-size --> change to 20% --> copy+paste onto tag --> place on the left side of the backpack above the locker
-Open pencil --> image --> re-size --> change to 20% --> copy+paste onto tag --> place on the left side of the crayon above the locker
-Open globe --> image --> re-size --> change to 32% --> copy+paste onto tag --> place on the right side of the tag
-Open ruler --> image --> rotate custom 15 deg left --> re-size --> change to 60% --> copy+paste onto tag --> place in the middle of the tag behind locker
-Open calculator --> image --> re-size --> change to 16% --> copy+paste onto tag --> place on the right side of the tag above the ruler
-Open marker --> image --> rotate custom 95 deg left --> re-size --> change to 20% --> copy+paste onto tag --> place in the left side above the calculaor
-Open stapler --> image --> re-size --> change to 10% --> copy+paste onto tag --> place in the middle above the ruler
-Open pen --> rotate custom 40 deg right --> image --> re-size --> change to 30% --> copy+paste onto tag --> place above the ruler to the right of the stapler and left of the locker
Add your tube of choice
Add drop shadow to your liking
Name:
-Photoshop Elements 9
-Font of choice (mine is Back To School so these settings work for my font. you may need to alter slightly for yours)
-layer --> layer style --> style settings
drop shadow: 30 deg angle; 5, 10, 75%; black
stroke: 2, 100, purple (9357eb)
Add copyright and watermark
DONE

Friday, May 2, 2014
Irish Princess Designs ~ Sweet Spring
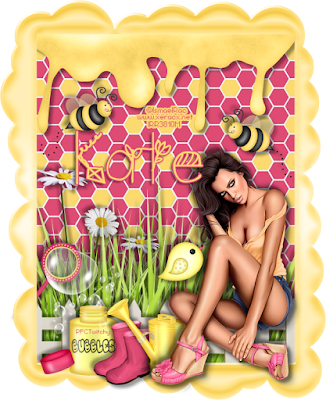
Supplies:
Program: Paint Shop Pro X5 and Photoshop Elements 9 (other versions should work)
Tube of choice: 2013 Spring Attitude by Ismael Rac. You must have a license to use his tubes.
Font: Spring Time
Tutorial:
-Open frame --> shift+D (or re-save as a new file if using photoshop)-Open paper 6 --> ctrl+a --> copy+paste --> place onto tag below frame --> re-size to your liking
-Open honey --> image --> re-size --> change to 85% --> copy+paste onto tag --> place at the top under the frame
-Open grass --> image --> re-size --> change to 91% --> copy+paste onto tag --> place on the bottom left of the tag --> duplicate --> move duplicate layer to the right and down slightly --> merge --> duplicate merged layer
-Open daisys --> image --> re-size --> change to 43% --> copy+paste onto tag --> place on the left side between each of the grass layers
-Open fence --> image --> re-size --> change to 95% --> copy+paste onto tag --> place in the center above the grass --> re-size the sides for it to fit into the frame
-Open boots --> image --> re-size --> change to 28% --> copy+paste onto tag --> place
-Open bubble bottle --> image --> re-size --> change to 41% --> copy+paste onto tag --> place on the left side at the bottom above the frame--> duplicate --> hide the duplicate layer --> use the rectangle selection tool to select part of the wands handle --> press delete to remove the excess handle --> do the same for the duplicate layer
-Open boots --> image --> re-size --> change to 18% --> copy+paste onto tag --> place to the right of the bubble bottle covering the edge of the bottle
-Open watering can --> image --> re-size --> change to 28% --> copy+paste onto tag --> place to the right of the boots
-Open bird --> image --> re-size --> change to 15% --> copy+paste onto tag --> place to the right of the watering can on your tube (depending on what you use)
Add your tube of choice
Add drop shadow to your liking
Name:
-Photoshop Elements 9
-Font of choice (mine is Spring Time so these settings work for my font. you may need to alter slightly for yours)
-layer --> layer style --> style settings
drop shadow: 30 deg angle; 5, 5, 75%; black
stroke: 2, 100, pink(df4b75)
Add copyright and watermark
DONE
Subscribe to:
Posts
(Atom)
My Blinkies