My Sites
Forums


Saturday, July 19, 2014
New Blog Clothes!!
Thanks to me and artisteer, I was able to create a new blog layout :) This is much better than what I had before!!

Monday, June 23, 2014
FTU Tut - Purple Pleasures (Photoshop)

This tutorial is of my own creation and any resemblance, or likeness, to any other tut is purely coincidental. This tutorial is for personal use only; any use for monetary gain is illegal.
Supplies:
Program: Photoshop Elements 9 (other versions should work)
FTU Kit: Purple Pleasures by Gold Dust
Font: Admiration Pains
Kit Materials:
Frame4
Paper14
Bird3
Boots
Butterflies
Cat
Bench
Fence
Flower8
Flowers2
Grass
Sparkles
Tutorial:
-Open frame4 and press F12 to re-save it as something else to avoid saving over the actual frame.
-Open paper14 and paste onto tag --> re-size to your liking
-Open paper14 and paste onto tag --> re-size to your liking
-Open bench. image --> rotate --> flip horizontal then re-size by 43%. Place on tag behind the frame.
-Open cat. Re-size by 35% and rotate slightly to the left for the kitty to fit nicely on the bench. Place above the bench.
-Open grass. Paste on tag behind the bench and cat then duplicate. move the duplicate layer above the bench and cat --> move slightly up so it looks like the bench is sitting inside the grass. Click on the magic wand (in your panel on the side) --> select the frame --> click inside the frame --> selections --> select all --> modify --> expand --> 5 --> ctrl+shift+i --> press delete on both grass layers --> deselect.
-Open fence. Re-size by 32% and duplicate twice. Move one fence to the far left, one in the center, and one to the far right. Overlap each one so it looks like one fence then merge the 3 layers together.
-Open flower8. re-size by 25% --> place on tag behind the bench towards the left side of it
-Open boots. image --> rotate --> flip horizontal then re-size by 25%. place behind the frame above all the other layers
-Open bird3. re-size 20% and paste above the fence layer so it looks like it's standing there.
-Open sparkles. place onto tag above the paper layer then click on the magic wand (in your panel on the side) --> select the frame --> click inside the frame --> selections --> select all --> modify --> expand --> 5 --> ctrl+shift+i --> press delete
-Open butterflies. image --> rotate --> custom --> 25 deg right. re-size by 90%. place onto tag and duplicate then adjust the two layers to your liking --> merge the two layers
-Open flowers2. re-size by 52%. place above frame in upper right corner. rotate original flowers2 to 90 deg then image --> rotate --> 90 deg left --> place that layer in the upper left corner. rotate original flowers2 again 90 deg left and place that layer in the bottom left corner. rotate original flowers2 one more time 90 deg left and place it on the bottom right corner.
Add drop shadow to elements to your liking.
Name:
-Font of choice (mine is Admiration Pains so these settings work for my font. you may need to alter slightly for yours)
-layer --> layer style --> style settings
drop shadow: 30 deg angle; 5, 10, 75%; black
stroke: 1, 100, light purple (#af8fcf)
Add copyright (for the scrap kit) and watermark
DONE
Wednesday, May 7, 2014
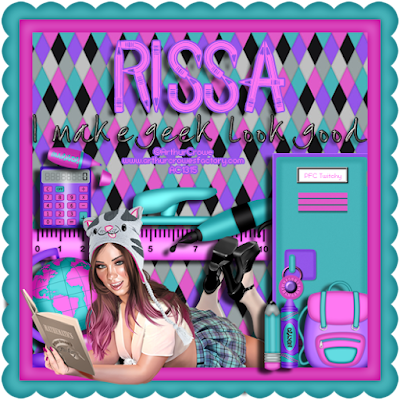
Rissa's Designs ~ School Nerd
This tutorial is of my own creation and any resemblance, or likeness, to any other tut is purely coincidental. This tutorial is for personal use only; any use for monetary gain is illegal.
Supplies:
Program: Paint Shop Pro X5 and Photoshop Elements 9 (other versions should work)
Tube of choice: Kitty Babe School by Arthur Crowe. You must have a license to use his tubes.
PTU Kit: School Nerd by Rissa's Designs
Font: Back to School
Tutorial:
-Open frame 2 --> shift+D (or re-save as a new file if using photoshop)-Open paper 4 --> ctrl+a --> copy+paste --> place onto tag below frame --> re-size to your liking
-Open wordart 1 --> image --> re-size --> change to 41% --> copy+paste onto tag --> place at the top in the middle
-Open locker --> image --> re-size --> change to 55% --> copy+paste onto tag --> place at the left side of the tag
-Open backpack --> image --> re-size --> change to 23% --> copy+paste onto tag --> place at the left side of the tag above the locker
-Open crayon --> image --> re-size --> change to 20% --> copy+paste onto tag --> place on the left side of the backpack above the locker
-Open pencil --> image --> re-size --> change to 20% --> copy+paste onto tag --> place on the left side of the crayon above the locker
-Open globe --> image --> re-size --> change to 32% --> copy+paste onto tag --> place on the right side of the tag
-Open ruler --> image --> rotate custom 15 deg left --> re-size --> change to 60% --> copy+paste onto tag --> place in the middle of the tag behind locker
-Open calculator --> image --> re-size --> change to 16% --> copy+paste onto tag --> place on the right side of the tag above the ruler
-Open marker --> image --> rotate custom 95 deg left --> re-size --> change to 20% --> copy+paste onto tag --> place in the left side above the calculaor
-Open stapler --> image --> re-size --> change to 10% --> copy+paste onto tag --> place in the middle above the ruler
-Open pen --> rotate custom 40 deg right --> image --> re-size --> change to 30% --> copy+paste onto tag --> place above the ruler to the right of the stapler and left of the locker
Add your tube of choice
Add drop shadow to your liking
Name:
-Photoshop Elements 9
-Font of choice (mine is Back To School so these settings work for my font. you may need to alter slightly for yours)
-layer --> layer style --> style settings
drop shadow: 30 deg angle; 5, 10, 75%; black
stroke: 2, 100, purple (9357eb)
Add copyright and watermark
DONE
Friday, May 2, 2014
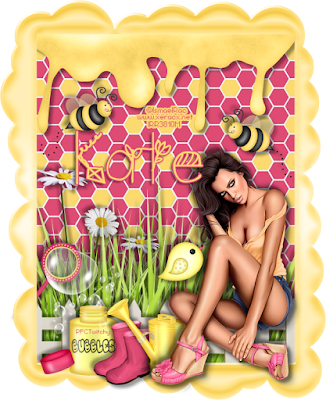
Irish Princess Designs ~ Sweet Spring
Supplies:
Program: Paint Shop Pro X5 and Photoshop Elements 9 (other versions should work)
Tube of choice: 2013 Spring Attitude by Ismael Rac. You must have a license to use his tubes.
Font: Spring Time
Tutorial:
-Open frame --> shift+D (or re-save as a new file if using photoshop)-Open paper 6 --> ctrl+a --> copy+paste --> place onto tag below frame --> re-size to your liking
-Open honey --> image --> re-size --> change to 85% --> copy+paste onto tag --> place at the top under the frame
-Open grass --> image --> re-size --> change to 91% --> copy+paste onto tag --> place on the bottom left of the tag --> duplicate --> move duplicate layer to the right and down slightly --> merge --> duplicate merged layer
-Open daisys --> image --> re-size --> change to 43% --> copy+paste onto tag --> place on the left side between each of the grass layers
-Open fence --> image --> re-size --> change to 95% --> copy+paste onto tag --> place in the center above the grass --> re-size the sides for it to fit into the frame
-Open boots --> image --> re-size --> change to 28% --> copy+paste onto tag --> place
-Open bubble bottle --> image --> re-size --> change to 41% --> copy+paste onto tag --> place on the left side at the bottom above the frame--> duplicate --> hide the duplicate layer --> use the rectangle selection tool to select part of the wands handle --> press delete to remove the excess handle --> do the same for the duplicate layer
-Open boots --> image --> re-size --> change to 18% --> copy+paste onto tag --> place to the right of the bubble bottle covering the edge of the bottle
-Open watering can --> image --> re-size --> change to 28% --> copy+paste onto tag --> place to the right of the boots
-Open bird --> image --> re-size --> change to 15% --> copy+paste onto tag --> place to the right of the watering can on your tube (depending on what you use)
Add your tube of choice
Add drop shadow to your liking
Name:
-Photoshop Elements 9
-Font of choice (mine is Spring Time so these settings work for my font. you may need to alter slightly for yours)
-layer --> layer style --> style settings
drop shadow: 30 deg angle; 5, 5, 75%; black
stroke: 2, 100, pink(df4b75)
Add copyright and watermark
DONE
Monday, April 28, 2014
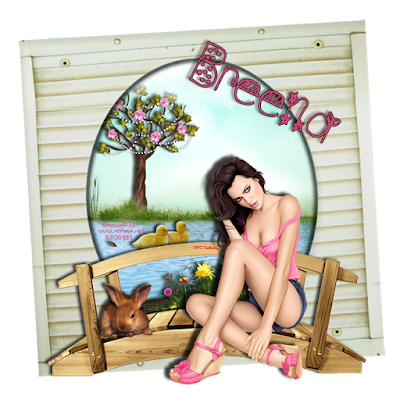
Breena's Hot Spot ~ Spring Time
Supplies:
Program: Paint Shop Pro X5 and Photoshop Elements 9 (other versions should work)
Tube of choice: 2013 Spring Attitude by Ismael Rac. You must have a license to use his tubes.
PTU Kit: It's A Spring Thing by Breena's Hot Spot
Font: Spring Time
Tutorial:
-Open frame 2 --> shift+D (or re-save as a new file if using photoshop)-Open paper 6 --> ctrl+a --> copy+paste --> place onto tag below frame --> re-size as desired
-Open lake --> image --> re-size --> change to 78% --> copy+paste onto tag --> place below frame and above the paper
-Open tree --> image --> re-size --> change to 45% --> copy+paste onto tag --> place behind the grass on the lake on the left side
-Open cloud 2 --> image --> re-size --> change to 50% --> copy+paste onto tag --> place above tree
-Open wooden bridge --> copy+paste onto tag --> place above frame in the center
-Open chicks --> image --> re-size --> change to 33% --> copy+paste onto tag --> place above the lake behind the upper rail of the wooden bridge
-Open log --> image --> re-size --> change to 45% --> copy+paste onto tag --> place above the lake behind the frame and wooden bridge towards the right
-Open bunny 2 --> image --> re-size --> change to 45% --> copy+paste onto tag --> place above the wooden bridge on the left side
-Open tube of choice --> re-size to your liking --> copy+paste onto tag --> place above the wooden bridge on the right side
Add drop shadow to your liking
Name:
-Photoshop Elements 9
-Font of choice (mine is Spring Time so these settings work for my font. you may need to alter slightly for yours)
-layer --> layer style --> style settings
drop shadow: -24 deg angle; 5, 5, 75%; black
Add copyright and watermark
DONE
Sunday, April 27, 2014
Photoshop or Paint Shop Pro?
See a tutorial you love, but not in the program you use? Let me know because I can re-write it in photoshop or paint shop pro. I do not use Gimp, but you can go to Amy & Leah's Gimptastic Tuts if you use Gimp.
Thursday, January 23, 2014
FTU Tut - Back 2 School (Photoshop Version)

This tutorial is of my own creation and any resemblance, or likeness, to any other tut is purely coincidental. This tutorial is for personal use only; any use for monetary gain is illegal.
Supplies:
Program: Photoshop Elements 9 (other versions should work)
Tube of choice: Exclusive tube sold at Pics for Design (must have a license to use the tubes)
FTU Kit: School of Rac by Scraps by Randy's Sin
Template: 43mpm from Millie's PSP Madness (check the right side under temps in bulk for temps 031-060)
Font: Grafitti
Tutorial:
-Open template. Re-save it in another folder with your title as to avoid saving over the original template. Delete credits, layer 11, and background
*Do NOT delete the template layers as you will need them*
Blue Square (1): open paper 11 --> re-size to go over the square --> duplicate it --> hide the duplicate (for now) --> select the blue square (1) layer --> select the magic wand in the tool bar --> use the wand on the blue square (1) layer --> click the layer with paper 11 (the one that's visible) --> press ctrl+shift+i --> press delete on the keyboard
Blue Square (2): move paper 11 copy above this layer --> select the blue square (2) layer --> select the magic wand in the tool bar --> use the wand on the blue square (1) layer --> click the layer with paper 11 --> press ctrl+shift+i --> press delete on the keyboard
Red Circle (3): open paper 5 --> re-size to go over the circle--> duplicate it --> hide the duplicate (for now) --> select the red circle (3) layer --> select the magic wand in the tool bar --> use the wand on the red circle (3) layer --> click the layer with paper 5 (the one that's visible) --> press ctrl+shift+i --> press delete on the keyboard
Red Circle (4): move paper 5 copy above this layer --> select the red circle (4) layer --> select the magic wand in the tool bar --> use the wand on the red circle (4) layer --> click the layer with paper 5 --> press ctrl+shift+i --> press delete on the keyboard
Grey Rectangle (5): open paper 3 --> re-size to go over the rectangle--> duplicate it --> hide the duplicate (for now) --> select the grey rectangle (5) layer --> select the magic wand in the tool bar --> use the wand on the grey rectangle (5) layer --> click the layer with paper 3 (the one that's visible) --> press ctrl+shift+i --> press delete on the keyboard
Grey Rectangle (6): move the paper 3 copy above this layer --> select the grey rectangle (6) layer --> select the magic wand in the tool bar --> use the wand on the grey rectangle (6) layer --> click the layer with paper 3 --> press ctrl+shift+i --> press delete on the keyboard
Amber Circle (7): open paper 2 --> re-size to go over the circle--> duplicate it --> hide the duplicate (for now) --> select the amber circle (7) layer --> select the magic wand in the tool bar --> use the wand on the amber circle (7) layer --> click the layer with paper 3 (the one that's visible) --> press ctrl+shift+i --> press delete on the keyboard
Green Rectangle (9): open paper 1 --> re-size to go over the rectangle--> duplicate it --> hide the duplicate (for now) --> select the green rectangle (9) layer --> select the magic wand in the tool bar --> use the wand on the green rectangle (9) layer --> click the layer with paper 1 --> press ctrl+shift+i --> press delete on the keyboard
Blue Rectangle (10): open paper 6 --> re-size to go over the rectangle--> duplicate it --> hide the duplicate (for now) --> select the blue rectangle (10) layer --> select the magic wand in the tool bar --> use the wand on the blue rectangle (10) layer --> click the layer with paper 6 --> press ctrl+shift+i --> press delete on the keyboard
-Open rs_100 --> ctrl+a (select all) --> ctrl+n --> click okay --> ctrl+v --> ctrl+alt+i --> change pixels to percent --> 15% --> click okay --> copy+paste onto tag --> move over the lined paper layer on the upper left
-Open rs_pushpin2 --> ctrl+a (select all) --> ctrl+n --> click okay --> ctrl+v --> ctrl+alt+i --> change pixels to percent --> 12% --> click okay --> copy+paste onto tag --> move over the lined paper layer on the upper left
-Open rs_clock2 --> ctrl+a (select all) --> ctrl+n --> click okay --> ctrl+v --> ctrl+alt+i --> change pixels to percent --> 28% --> click okay --> copy+paste onto tag --> move over the lined paper layer in the center towards the top of the rectangle
-Open tube of choice --> re-size to your liking --> move to the right side of the tag above the clock layer
-Open rs_checkmark1 --> ctrl+a (select all) --> ctrl+n --> click okay --> ctrl+v --> ctrl+alt+i --> change pixels to percent --> 15% --> click okay --> copy+paste onto tag --> move over the lined paper layer in the center of the rectangle
-Open rs_lockers4 --> ctrl+a (select all) --> ctrl+n --> click okay --> ctrl+v --> ctrl+alt+i --> change pixels to percent --> 37% --> click okay --> copy+paste onto tag --> move to the left side of the tag above the rectangles that are in the center
-Open rs_desk1 --> image --> rotate --> flip horizontal --> ctrl+a (select all) --> ctrl+n --> click okay --> ctrl+v --> ctrl+alt+i --> change pixels to percent --> 32% --> click okay --> copy+paste onto tag --> move to the left side of the tag above the lockers layer --> duplicate layer --> select the rectangular marquee too --> select the top half on the duplicate layer --> press delete --> place that layer above your tool
-Open rs_calculator1 --> ctrl+a (select all) --> ctrl+n --> click okay --> ctrl+v -->
ctrl+alt+i --> change pixels to percent --> 12% --> click okay
--> copy+paste onto tag --> move to the center of the tag and place it above the desk
-Open rs_books1 --> ctrl+a (select all) --> ctrl+n --> click okay --> ctrl+v --> ctrl+alt+i --> change pixels to percent --> 20% --> click okay --> copy+paste onto tag --> move to the center of the tag and place it above the calculator layer
-Open rs_pencil8 --> image --> rotate --> rotate 90% right --> ctrl+a (select all) --> ctrl+n --> click okay --> ctrl+v --> ctrl+alt+i --> change pixels to percent --> 15% --> click okay --> copy+paste onto tag --> move to the center of the tag and place it above the books layer
-Open rs_pen3 --> image --> rotate --> flip horizontal --> ctrl+a (select all) --> ctrl+n --> click okay --> ctrl+v --> ctrl+alt+i --> change pixels to percent --> 10% --> click okay --> copy+paste onto tag --> move to the center of the tag and place it above the pencil layer
-Open rs_scissors3 --> image --> rotate --> custom --> 45 deg left --> ctrl+a (select all) --> ctrl+n --> click okay --> ctrl+v --> ctrl+alt+i --> change pixels to percent --> 7% --> click okay --> copy+paste onto tag --> move to the center of the tag and place it above the pen layer
-Open rs_stapler3 --> ctrl+a (select all) --> ctrl+n --> click okay --> ctrl+v --> ctrl+alt+i --> change pixels to percent --> 5% --> click okay --> copy+paste onto tag --> move to the center of the tag and place it above scissors layer
-Open rs_diary --> ctrl+a (select all) --> ctrl+n --> click okay --> ctrl+v --> ctrl+alt+i --> change pixels to percent --> 22% --> click okay --> copy+paste onto tag --> move towards the upper left of the tag behind the paper layer
-Open rs_homework--> ctrl+a (select all) --> ctrl+n --> click okay --> ctrl+v --> ctrl+alt+i --> change pixels to percent --> 30% --> click okay --> copy+paste onto tag --> move the book and the duplicate desk (the one where you deleted the top off) above your tube layer
*SHADOWING* You can do it my way or use Photoshop's settings in style settings. My way assures a drop shadow around each shape to get the effect of what Paint Shop Pro can do.
-Color fill each template layer (the original layers) to black using the F key (flood fill tool)
Layer 1: duplicate --> hide duplicate layer --> move layer 1 where you'd like to see a drop shadow under the paper layer --> unhide the layer 1 copy --> position to your liking --> filter --> blur --> gaussian blur --> change settings to your liking (I do a radius of 5 pixels) --> do it both layers
Layer 2: move layer 2 where you'd like to see a drop shadow under the paper layer --> position to your liking --> filter --> blur --> gaussian blur --> change settings to your liking
Layer 3: duplicate --> hide duplicate layer --> move layer 1 where you'd like to see a drop shadow under the paper layer --> unhide the layer 3 copy --> position to your liking --> filter --> blur --> gaussian blur --> change settings to your liking --> do it both layers
Layer 4: move layer 4 where you'd like to see a drop shadow under the paper layer --> position to your liking --> filter --> blur --> gaussian blur --> change settings to your liking
Layer 5: duplicate --> hide duplicate layer --> move layer 1 where you'd like to see a drop shadow under the paper layer --> unhide the layer 5 copy --> position to your liking --> filter --> blur --> gaussian blur --> change settings to your liking --> do it both layers
Layer 6: move layer 6 where you'd like to see a drop shadow under the paper layer --> position to your liking --> filter --> blur --> gaussian blur --> change settings to your liking
Layer 7: move layer 7 where you'd like to see a drop shadow under the paper layer --> position to your liking --> filter --> blur --> gaussian blur --> change settings to your liking
Layer 8: move layer 8 where you'd like to see a drop shadow under the paper layer --> position to your liking --> filter --> blur --> gaussian blur --> change settings to your liking
Layer 9: move layer 9 where you'd like to see a drop shadow under the paper layer --> position to your liking --> filter --> blur --> gaussian blur --> change settings to your liking
Add drop shadows to the elements and tube as you desire
Name:
-Font of choice (mine is Grafitti so these settings work for my font. you may need to alter slightly for yours)
-layer --> layer style --> style settings
drop shadow: 30 deg angle; 5, 10, 75%; black
bevel: 5
stroke: 3, 100, black
I did the font 3 times with each color from the kit to say "Rebecca Wuz Here" and that is optional.
I did the font 3 times with each color from the kit to say "Rebecca Wuz Here" and that is optional.
Add copyright and watermark
DONE
Monday, January 6, 2014
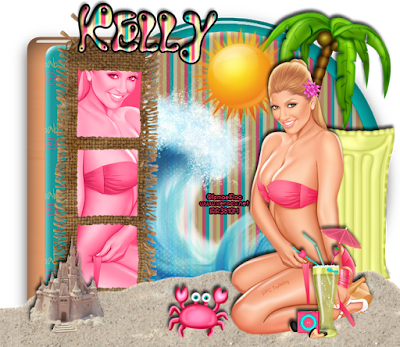
Evol Angel Scrapz ~ Sweet Summertime
This
tutorial is of my own creation and any resemblance, or likeness, to any
other tut is purely coincidental. This tutorial is for personal use
only; any use for monetary gain is illegal.
Supplies:
Program: Paint Shop Pro X5 (other versions should work) and Photoshop Elements 9 (for name & copyright)
Plugins: Alien Skin Eye Candy 5: Impact - bevel and glass *optional*
Plugins: Alien Skin Eye Candy 5: Impact - bevel and glass *optional*
Tube of choice: 2013 Tropical Beauty by Ismael Rac. You must have a license to use his tubes.
PTU Kit: Beach Baby by Evol Angel Scrapz
Template: 259mpm from Millie's PSP Madness
Font: Water Park
Tutorial:
-Open template. Shift D. Close original. Delete credits, layers 7 and 8. Merge layers 5 and 6 (orange squares).
Red Circle: open paper 6 --> selections --> select all
Red Circle: open paper 6 --> selections --> select all
Go
back to the template. Select the layer with the red circle:
selections --> select all --> float --> defloat --> inverse--> paste paper --> delete
Yellow Rectangle: open paper 9 --> selections --> select all
Go
back to the template. Select the layer with the yellow rectangle:
selections --> select all --> float --> defloat --> inverse--> paste paper --> delete
Red Rectangle: open paper 1 --> selections --> select all
Go
back to the template. Select the layer with the red rectangle:
selections --> select all --> float --> defloat --> inverse--> paste paper --> delete
Orange Squares: open paper 10 --> selections --> select all
Go
back to the template. Select the layer with the orange squares:
selections --> select all --> float --> defloat --> inverse--> paste paper --> delete
Green Circle: open paper 11 --> selections --> select all
Go
back to the template. Select the layer with the green circle:
selections --> select all --> float --> defloat --> inverse--> paste paper --> delete
-Open tube of choice --> re-size to your liking --> move to the right side of the tag --> duplicate tube layer --> flip horizontally --> move to the left side under frame 2
-Open Wave --> copy+paste onto tag --> move above the circle layer with the striped paper
-Open Floatie --> re-size 45% --> copy+paste onto tag --> move to the right side under the tube
-Open Palm Tree --> re-size 65% --> copy+paste onto tag --> move to the right side under the tube
-Open Sand --> copy+paste onto tag --> move to the right under the tube --> duplicate sand layer --> move over towards the left side
-Open SandCastle --> re-size 35% --> copy+paste onto tag --> move to the left side above the sand
-Open Sun --> re-size 35% --> copy+paste onto tag --> move to the top center
-Open Cocktail --> re-size 40% --> copy+paste onto tag --> move to the right side above tube
-Open Mini iPod --> re-size 15% --> copy+paste onto tag --> move to the right side above tube
-Open Crab --> re-size 25%
Name:
-Photoshop Elements 9
-Font of choice (mine is Water Park so these settings work for my font. you may need to alter slightly for yours)
-layer --> layer style --> style settings
drop shadow: -68 deg angle; 5, 5, 75%; black
bevel: 5
stroke: 3, 100, black
Pattern: Paper 12
-selections --> select all --> copy --> paste onto tag --> deselect --> re-size over name -->selections --> select all --> float --> defloat --> inverse--> paste paper --> delete
Pattern: Paper 12
-selections --> select all --> copy --> paste onto tag --> deselect --> re-size over name -->selections --> select all --> float --> defloat --> inverse--> paste paper --> delete
Add copyright and watermark
DONE
Subscribe to:
Posts
(Atom)
My Blinkies