My Sites


Forums


Tuesday, December 31, 2013
Coyotie Designs ~ Summeriffic

Supplies:
Program: Paint Shop Pro X5 (other versions should work) and Photoshop Elements
Tube: 2013 Tropical Beauty by Ismael Rac. You must have a license to use his tubes.
Tube: 2013 Tropical Beauty by Ismael Rac. You must have a license to use his tubes.
PTU Kit: Very Berry Summer by Coyotie Designs
Font: Splash Extra Bold
PHOTOSHOP ELEMENTS 9
-Open tube of choice --> re-size to your liking --> place above frame --> duplicate --> move below frame --> select tube above the frame --> rectangular marquee tool --> select the arm that is above the flowers --> press delete key
Tutorial:
PAINT SHOP PRO
-Open frame 4 --> shift D
-Open paper 9 --> re-size to fit inside the frame --> move to the left side --> duplicate --> move to the right side (where it looks like one paper) --> merge the two paper layers
-Open frame 4 --> shift D
-Open paper 9 --> re-size to fit inside the frame --> move to the left side --> duplicate --> move to the right side (where it looks like one paper) --> merge the two paper layers
PHOTOSHOP ELEMENTS 9
-Open tube of choice --> re-size to your liking --> place above frame --> duplicate --> move below frame --> select tube above the frame --> rectangular marquee tool --> select the arm that is above the flowers --> press delete key
PAINT SHOP PRO
-Open ele2 --> re-size 28% --> place above the tube that is above the frame --> move to the right side
-Open ele8 --> re-size 23% --> place below the tube that is above the frame --> move to center of frame
-Open ele14 --> re-size 55% --> place above paper
-Open ele13 --> re-size 26% --> place above the frame
-Open ele22 --> re-size 42% --> place above ele13
Add drop shadows and other effects/filters you wish
Name:
-Photoshop Elements 9
-Font of choice (mine is Splash Extra Bold so these settings work for my font. you may need to alter slightly for yours)
-layer --> layer style --> style settings
drop shadow: 30 deg angle; 5, 5, 75%; black
stroke: 2, 100, white
Add copyright and watermark
DONE

Irish Princess Designs ~ Chocolate Wonderland

This tutorial is of my own creation and any resemblance, or likeness, to any other tut is purely coincidental. This tutorial is for personal use only; any use for monetary gain is illegal.
Supplies:
Program: Paint Shop Pro X5 (other versions should work) and Photoshop Elements 9 (for name & copyright)
Tube: Winter Song by Alfadesire. Must have a license to use his tubes.
Tube: Winter Song by Alfadesire. Must have a license to use his tubes.
PTU Kit: Cocoa Cane by Irish Princess Designs
Font: Coffee and Curry
-Open frame 1 --> shift D
-Open paper 5 --> re-size to fit inside the frame
-Open Branches --> re-size 50% --> copy&paste onto tag --> place below frame --> move to bottom right corner --> duplicate --> flip horizontal --> rotate 90 deg right --> move towards upper
left corner
-Open Ornaments --> re-size 60% --> copy&paste onto tag --> move towards left side of the frame --> place above the frame
-Open tube of choice --> copy&paste onto tag --> use a close-up layer --> re-size as you see fit --> position to the right --> change opacity to 50%
-Open Snow --> copy&paste onto tag --> move below frame --> place above tube of choice
-Open Tree --> re-size 75% --> copy&paste onto tag --> move to the center --> place above frame and behind the santa and elf
-Paste your tube of choice above the frame then re-size to your liking
Add drop shadows and other effects/filters you wish
Tutorial:
-Open frame 1 --> shift D
-Open paper 5 --> re-size to fit inside the frame
-Open Branches --> re-size 50% --> copy&paste onto tag --> place below frame --> move to bottom right corner --> duplicate --> flip horizontal --> rotate 90 deg right --> move towards upper
left corner
-Open Ornaments --> re-size 60% --> copy&paste onto tag --> move towards left side of the frame --> place above the frame
-Open tube of choice --> copy&paste onto tag --> use a close-up layer --> re-size as you see fit --> position to the right --> change opacity to 50%
-Open Snow --> copy&paste onto tag --> move below frame --> place above tube of choice
-Open Tree --> re-size 75% --> copy&paste onto tag --> move to the center --> place above frame and behind the santa and elf
-Paste your tube of choice above the frame then re-size to your liking
Add drop shadows and other effects/filters you wish
Name:
-Photoshop Elements 9
-Font of choice (mine is Coffee and Curry so these settings work for my font. you may need to alter slightly for yours)
-layer --> layer style --> style settings
drop shadow: 30 deg angle; 5, 10, 75%; black
bevel: 5
stroke: 2, 100, cream (#fbfddb)
Add copyright and watermark
DONE
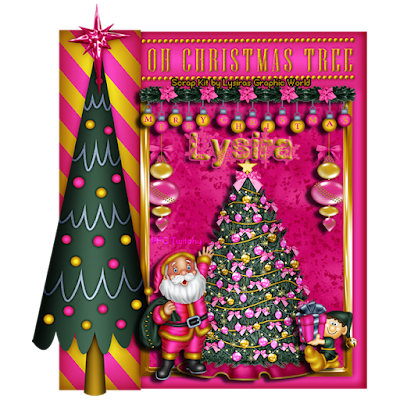
Lysiras Graphic World ~ Twisted Christmas
Supplies:
Program: Paint Shop Pro X5 (other versions should work) and Photoshop Elements 9 (for name & copyright)
PTU Kit: Christmas Twist by Lysiras Graphic World
Font: Snowflakes
-Open frame 1 --> shift D
-Open paper 6 --> re-size to fit inside the frame
-Open Xmas Ornament --> re-size 70% --> copy&paste onto tag --> place above frame under the "Oh Christmas Tree" part
-Open Santa Claus --> re-size 55% --> copy&paste onto tag --> move towards left side of the frame --> place above the frame
-Open Elf with gift --> re-size 30% --> copy&paste onto tag --> move to the right side of the frame --> place above the frame
-Open Christmas Tree --> re-size 83% --> copy&paste onto tag --> move to the center --> place above frame and behind the santa and elf
-Open Christmas Ball 01 --> re-size 457% --> copy&paste onto tag --> move to the right side --> place behind frame --> duplicate --> move the duplicate to the left side
-Paste your tube of choice (if you use one)
Add drop shadows and other effects/filters you wish
Tutorial:
-Open frame 1 --> shift D
-Open paper 6 --> re-size to fit inside the frame
-Open Xmas Ornament --> re-size 70% --> copy&paste onto tag --> place above frame under the "Oh Christmas Tree" part
-Open Santa Claus --> re-size 55% --> copy&paste onto tag --> move towards left side of the frame --> place above the frame
-Open Elf with gift --> re-size 30% --> copy&paste onto tag --> move to the right side of the frame --> place above the frame
-Open Christmas Tree --> re-size 83% --> copy&paste onto tag --> move to the center --> place above frame and behind the santa and elf
-Open Christmas Ball 01 --> re-size 457% --> copy&paste onto tag --> move to the right side --> place behind frame --> duplicate --> move the duplicate to the left side
-Paste your tube of choice (if you use one)
Add drop shadows and other effects/filters you wish
Name:
-Photoshop Elements 9
-Font of choice (mine is Snowflakes so these settings work for my font. you may need to alter slightly for yours)
-layer --> layer style --> style settings
drop shadow: 30 deg angle; 5, 10, 75%; black
bevel: 5
stroke: 2, 100, pink (#e53193)
Add copyright and watermark
DONE
CT PTU Tut - I'm Dreaming of a Pink Christmas
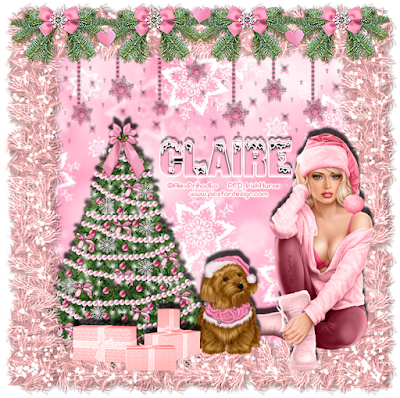
This tutorial is of my own creation and any resemblance, or likeness, to any other tut is purely coincidental. This tutorial is for personal use only; any use for monetary gain is illegal.
Supplies:
Program: Paint Shop Pro X5 (other versions should work) and Photoshop Elements 9 (for name & copyright)
Tube of choice: I'm
using the artwork of Alex Prihodko. You must have a license to use his tubes. You can get the tube here
PTU Kit: Simply Pink Christmas by FwTags Creations
Font: Snowtop Caps
Tutorial:
-Open frame 3 --> shift D
-Open paper 4 --> re-size to fit inside the frame
-Open ele 2 --> re-size 65% --> copy&paste onto tag --> move to the left side --> place behind the frame & above the paper
-Open ele 3 --> re-size 28% --> copy&paste onto tag --> move to the center --> place above the frame
-Open ele 13 --> re-size 86% --> copy&paste onto tag --> move to the top --> place above the frame
-Open ele 34 --> re-size 32% --> copy&paste onto tag --> move to the left side --> place above the frame, in front of the tree, and above the dog layer
-Open ele 41 --> re-size 77% --> copy&paste onto tag --> move to the top --> place behind the frame and above the tree layer
-Paste your tube of choice
Add drop shadows and other effects/filters you wish
Name:
-Photoshop Elements 9
-Font of choice (mine is Snowtop Caps so these settings work for my font. you may need to alter slightly for yours)
-layer --> layer style --> style settings
drop shadow: -94 deg angle; 3, 8, 100%; black
bevel: 4
stroke: 2, 100, white
Add copyright and watermark
DONE
CT PTU Tut - Warm Cocoa

This tutorial is of my own creation and any resemblance, or likeness, to any other tut is purely coincidental. This tutorial is for personal use only; any use for monetary gain is illegal.
Supplies:
Program: Paint Shop Pro X5 (other versions should work) and Photoshop Elements 9 (for name & copyright)
Tube of choice: I'm
using the artwork of Anna Marine. You must have a license to use her tubes. You can get the tube here
Font: Candy Store BV
Tutorial:
-Open paper 1 --> Shift+D
-Open mask #12 --> layer --> new mask layer --> from image --> select "source luminance" and leave "invert mask data" unchecked --> click ok --> select all (ctrl+a) --> copy (ctrl+c) --> go to your tag --> paste mask (ctrl+p)
-Open candy stick element --> copy & paste onto tag --> move to the right --> duplicate layer --> move to the left
-Open berries element --> rotate to the left --> copy & paste onto tag --> move towards bottom --> go back to the berries element --> rotate right x2 --> copy & paste onto tag --> move to the top
-Open candy swirl element --> re-size 23% --> move to bottom right corner --> duplicate --> move to upper left corner
-Open pops element --> re-size 50% --> move to bottom right corner --> place behind candy swirl
-Open branches element --> re-size 60% --> move towards the top left corner --> place behind the candy swirl, candy stick, and berries elements
-Open scarf element --> paste over paper
-Open falling snow element --> scarf
-Paste your tube of choice
Add drop shadows and other effects/filters you wish
Name:
-Photoshop Elements 9
-Font of choice (mine is Candy Store BV so these settings work for my font. you may need to alter slightly for yours)
-layer --> layer style --> style settings
drop shadow: -23 deg angle; 5, 10, 75%; black
bevel: 5
stroke: 3, 100, #dbbba3 (tan)
Add copyright and watermark
DONE
FTU Tut - Rocked

This
tutorial is of my own creation and any resemblance, or likeness, to any
other tut is purely coincidental. This tutorial is for personal use
only; any use for monetary gain is illegal.
Supplies:
Program: Paint Shop Pro X5 (other versions should work) and Photoshop Elements 9 (for name & copyright)
Tube of choice: I'm
using the artwork of Arthur Crowe. You must have a license to use his
tubes. I'm using a bonus tube, which is not available for purchase
FTU Kit: I Love Rock'n Roll from Lacarolita
Template: 56mpm from Millie's PSP Madness
Font: Rock It
Tutorial:
-Open template. Shift D. Close original. Delete credits
-Drop Shadow again: effects --> 3D effects --> drop shadow --> 8, -8, 54, 3, black
-Open tube of choice. Re-size 60%. Move to left side next to the word art.
Red Square: open paper 8 --> selections --> select all
Go
back to the template. Select the layer with the red square (2):
selections --> select all --> float --> defloat --> inverse
--> paste paper --> delete
Grey Square: open paper 20 --> selections --> select all
Go
back to the template. Select the layer with the grey square (1):
selections --> select all --> float --> defloat --> inverse
--> paste paper --> delete
Grey Circle: open paper 22 --> selections --> select all
Go
back to the template. Select the layer with the grey circle (7):
selections --> select all --> float --> defloat --> inverse
--> paste paper --> delete
Grey rectangles: merge down layers 8 and 9 --> open paper 15 --> selections --> select all
Go
back to the template. Select the layer with the grey rectangles (8
now): selections --> select all --> float --> defloat -->
inverse
--> paste paper --> delete
Delete layers 4 AND 5
Elements:
Guitar 1
Grab bag
Name:
-Photoshop Elements 9
-Font of choice (mine is Rock It so these settings work for my font. you may need to alter slightly for yours)
-layer --> layer style --> style settings
drop shadow: 30 deg angle; 5, 10, 75%; black
bevel: 5
stroke: 3, 100, black
Add copyright and watermark
DONE
Subscribe to:
Posts
(Atom)
My Blinkies