My Sites


Forums


Friday, June 16, 2017
Daelmans Designs ~ US of A
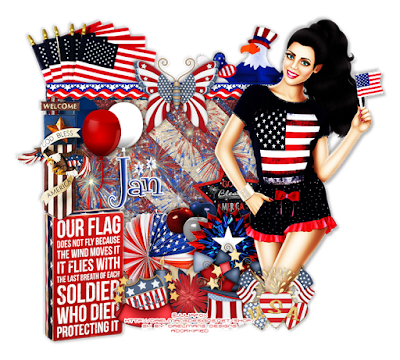
This
tutorial is of my own creation and any resemblance, or likeness, to any
other tut is purely coincidental. This tutorial is for personal use
only; any use for monetary gain is illegal.
Supplies:
Program: Photoshop Elements 13 (other versions may work)
Tube of choice: Summer Girl by Julia Fox. This tube comes with the kit.
PTU Kit: US of A by Daelmans Designs at Daelmans Designs, Digi Divas, Low Budget Scrapping, & Digi Graphic Designs
Font: Fontdinerdotcom Sparkly
Open:
Frame 2
Paper 1
Element 45
Element 103
Element 113
Element 92
Element 73
Element 70
Element 68
Element 71
Element 90
Element 59
Element 30
Element 98
Element 111
Element 108
Element 16
Element 95
Tube of choice
Tutorial
Paper 1: Place behind frame 2 --> resize to fit inside frame
Name:
Paper 1
Element 45
Element 103
Element 113
Element 92
Element 73
Element 70
Element 68
Element 71
Element 90
Element 59
Element 30
Element 98
Element 111
Element 108
Element 16
Element 95
Tube of choice
Tutorial
Frame 2: Open --> shift+D (or re-save as a new file if using photoshop)
Paper 1: Place behind frame 2 --> resize to fit inside frame
Element 45: Resize 75% --> place behind paper and frame --> position upper left
Element 103: Resize 75% --> place behind paper and frame -->position upper right
Element 113: Resize 45% --> place between paper and frame --> duplicate x2 --> position to your liking
Element 92: Resize 45% --> place above frame 2 --> position in the center on the right side
Element 73: Resize 75% --> place above element 92 --> position upper left corner of frame 2
Element 70: Resize 45% --> place above element 73 --> position diagonally down left of element 92
Element 68: Resize 30% --> place above element 70 --> position between elements 92 and 70
Element 71: Resize 45% --> place above element 68 --> position diagonally down right of element 68
Element 90: Resize 75% --> place above element 71 --> position on bottom left side of frame 2
Element 59: Resize 40% --> place above element 90--> position bottom center of frame 2
Element 30: Resize 50% --> place above element 59--> position to the right of element 59
Element 98: Resize 40% --> place above element 30--> position between elements 90 and 59
Element 111: Resize 45% --> place above element 98--> position left side of frame 2
Element 108: Resize 75% --> place above element 111--> position top of frame 2
Element 16: Resize 50% --> place above element 108 --> position top of frame 2 btwn eles 45 & 108
Tube of choice: Resize to your liking --> place above element 16 --> position right side of frame 2 --> duplicate x3 --> hide original tube layer --> add desired drop shadow on 1st duplicate layer --> apply plugin of choice on 2nd duplicate layer (I used Xero Radiance)--> change "normal" to "overlay" for 3rd duplicate layer

Element 95: Resize 45% --> place above tube of choice--> position over the bottom portion of the legs of the tube
Element 103: Resize 75% --> place behind paper and frame -->position upper right
Element 113: Resize 45% --> place between paper and frame --> duplicate x2 --> position to your liking
Element 92: Resize 45% --> place above frame 2 --> position in the center on the right side
Element 73: Resize 75% --> place above element 92 --> position upper left corner of frame 2
Element 70: Resize 45% --> place above element 73 --> position diagonally down left of element 92
Element 68: Resize 30% --> place above element 70 --> position between elements 92 and 70
Element 71: Resize 45% --> place above element 68 --> position diagonally down right of element 68
Element 90: Resize 75% --> place above element 71 --> position on bottom left side of frame 2
Element 59: Resize 40% --> place above element 90--> position bottom center of frame 2
Element 30: Resize 50% --> place above element 59--> position to the right of element 59
Element 98: Resize 40% --> place above element 30--> position between elements 90 and 59
Element 111: Resize 45% --> place above element 98--> position left side of frame 2
Element 108: Resize 75% --> place above element 111--> position top of frame 2
Element 16: Resize 50% --> place above element 108 --> position top of frame 2 btwn eles 45 & 108
Tube of choice: Resize to your liking --> place above element 16 --> position right side of frame 2 --> duplicate x3 --> hide original tube layer --> add desired drop shadow on 1st duplicate layer --> apply plugin of choice on 2nd duplicate layer (I used Xero Radiance)--> change "normal" to "overlay" for 3rd duplicate layer
Element 95: Resize 45% --> place above tube of choice--> position over the bottom portion of the legs of the tube
-Photoshop Elements13
-Font of choice (mine is Fontdinerdotcom Sparkly so these settings work for my font. you may need to alter slightly for yours)
-layer --> layer style --> style settings
drop shadow: 30 deg angle; 4, 4, 75%; black
stroke: 2, 100, #ffffff
bevel: 3px, up
font color: #1d3ea5
bevel: 3px, up
font color: #1d3ea5
Add copyright and watermark

Saturday, June 10, 2017
Monti's Scraps ~ Happy Autumn
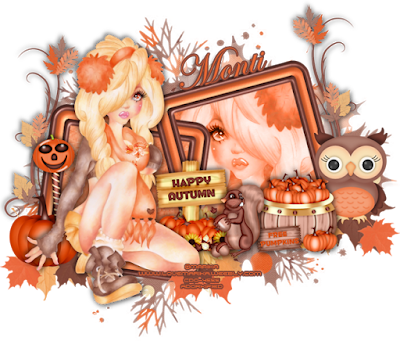
This
tutorial is of my own creation and any resemblance, or likeness, to any
other tut is purely coincidental. This tutorial is for personal use
only; any use for monetary gain is illegal.
Supplies:
Program: Photoshop Elements 13 (other versions may work)
Tube of choice: Individual Tube 12-2 by Marika. You must have a license to use her tubes.
PTU Kit: ScrapMonti_IB-Marika-12-2 by Monti's Scraps at Creative Design Outlet
Font: Edwardian Script (system font)
Mask: DD Fall Mask 8
Mask: DD Fall Mask 8
Open:
Frame 1
Paper 2
Paper 4
Element 1
Element 2
Element 4
Element 14
Element 17
Tube of choice
Tutorial
Paper 4: Place behind frame 1 --> duplicate --> resize original to fit in the right square --> select the frame layer --> magic wand --> select inside the right square --> select --> modify --> expand --> choose your desire settings --> ctrl+shift+I --> select the original paper layer --> hit delete
Name:
Paper 2
Paper 4
Element 1
Element 2
Element 4
Element 14
Element 17
Tube of choice
Tutorial
Frame 1: Open --> re-save with a different name
Paper 4: Place behind frame 1 --> duplicate --> resize original to fit in the right square --> select the frame layer --> magic wand --> select inside the right square --> select --> modify --> expand --> choose your desire settings --> ctrl+shift+I --> select the original paper layer --> hit delete
(repeat process for the duplicate paper layer)
Tube of choice: Place closeup of tube behind frame 1 --> select the frame layer --> magic wand --> select inside the right
square --> select --> modify --> expand --> choose your
desire settings --> ctrl+shift+I --> select the original paper
layer --> hit delete
Element 14: Paste onto tag --> resize to your liking --> place behind paper layer on the left side --> duplicate --> copy & paste duplicate as a new image --> image --> rotate --> flip horizontally --> place onto tag opposite side of the original element
Element 2: Paste onto tag --> resize to your liking --> place on the left side on top of the pumpkin
Element 4: Paste onto tag --> resize to your liking --> place in the center of the frame
Tube of choice (again): Paste onto tag --> resize to your liking --> position in the center of the left square
Element 1: Paste onto tag --> resize to your liking --> position to the right slightly to the left of the owl
Element 17: Paste onto tag --> resize to your liking --> position between elements 4 & 1
Mask: I used paper 2 and DD Fall Mask 8 by De
-Photoshop Elements13
-Font of choice (mine is Edwardian Script so these settings work for my font. you may need to alter slightly for yours)
-layer --> layer style --> style settings
drop shadow: 30 deg angle; 4, 4, 75%; black
stroke: 2, 100, #7d4136
font color: #ec6932
font color: #ec6932
Add copyright and watermark
Sunday, June 4, 2017
Monti's Scraps ~ Steampinked

This
tutorial is of my own creation and any resemblance, or likeness, to any
other tut is purely coincidental. This tutorial is for personal use
only; any use for monetary gain is illegal.
Supplies:
Program: Photoshop Elements 13 (other versions may work)
Tube of choice: Jaclyn by Alehandra Vanhek (exclusive). You must have a license to use his tubes.
PTU Kit: ScrapMonti_SteamPinked by Monti's Scraps at Creative Design Outlet
Plugins: Xero (Porcelain) ~ If this download doesn't work then let me know.
Font: Steamwreck
Open:
Frame 4
Paper 2
Element 3
Element 4
Element 9
Element 18
Element 20
Element 22
Element 34
Element 36
Element 40
Element 45
Element 50
Element 62
Element 64
Element 80
Element 80
Tube of choice
Tutorial:
Frame 4: Open --> re-save with a different name
Paper 2: paste behind frame 4 --> magic wand tool --> rectangle tool --> cover the bottom areas of the frame --> select --> modify --> expand --> choose the px to expand on --> ctrl + shift + i --> delete
Element 3: image --> rotate 90° left --> resize to your liking --> position in upper left side of the frame --> put behind paper 2
Element 62: resize to your liking --> place in front of frame 4 --> position right hand corner
Element 34: rotate 30° right --> resize to our liking --> duplicate --> place one copy in front of element 62 --> place the duplicate layer at the bottom of the frame --> position slightly off center
Tube of choice: recolor (if possible) to match the kit --> place close up of tube in front of paper 2 --> magic wand tool --> rectangle tool --> cover the bottom areas of the frame --> select --> modify --> expand --> choose the px to expand on --> ctrl + shift + i --> delete.
Tube of choice (again): resize to your liking --> place above frame 4 on the right side --> duplicate x2 --> hide layers for now
Xero plugin (PSP): these settings work for the tube that I used

Element 9: image --> rotate --> flip horizontal --> resize to your liking --> place behind tube of choice on the right side
Element 20: resize to your liking --> place above element 9 --> position lower right hand side of frame 4
Element 22: resize to your liking --> place above element 20 --> position upper portion of element 20
Element 40: rotate 50° left --> resize to your liking --> rectangular marquee tool --> select the heart vine --> ctrl + x --> position on the left side
Element 50: resize to your liking --> place above element 40 --> position at the lower left side of frame 4 --> place bottom left
Element 4: resize to your liking --> place above element 20 --> position bottom right
Element 64: resize to your liking --> place to the left of frame 4 --> position close to the close up of the tube
Element 34 (duplicate): place above element 4 --> position slightly lower than element 4
Element 36: resize to your liking --> place above element 34 duplicate --> position bottom lower center
Element 80: resize to your liking --> place above element 36 --> position bottom left portion of element 36
Element 18: resize to your liking --> place above element 80 --> position bottom left slightly off center of element 80
Element 45: resize to your liking --> place behind element 18 --> position to your liking (like the rose is sitting in the boot)
Element 62: resize to your liking --> place in front of frame 4 --> position right hand corner
Element 34: rotate 30° right --> resize to our liking --> duplicate --> place one copy in front of element 62 --> place the duplicate layer at the bottom of the frame --> position slightly off center
Tube of choice: recolor (if possible) to match the kit --> place close up of tube in front of paper 2 --> magic wand tool --> rectangle tool --> cover the bottom areas of the frame --> select --> modify --> expand --> choose the px to expand on --> ctrl + shift + i --> delete.
Tube of choice (again): resize to your liking --> place above frame 4 on the right side --> duplicate x2 --> hide layers for now
Xero plugin (PSP): these settings work for the tube that I used
Element 9: image --> rotate --> flip horizontal --> resize to your liking --> place behind tube of choice on the right side
Element 20: resize to your liking --> place above element 9 --> position lower right hand side of frame 4
Element 22: resize to your liking --> place above element 20 --> position upper portion of element 20
Element 40: rotate 50° left --> resize to your liking --> rectangular marquee tool --> select the heart vine --> ctrl + x --> position on the left side
Element 50: resize to your liking --> place above element 40 --> position at the lower left side of frame 4 --> place bottom left
Element 4: resize to your liking --> place above element 20 --> position bottom right
Element 64: resize to your liking --> place to the left of frame 4 --> position close to the close up of the tube
Element 34 (duplicate): place above element 4 --> position slightly lower than element 4
Element 36: resize to your liking --> place above element 34 duplicate --> position bottom lower center
Element 80: resize to your liking --> place above element 36 --> position bottom left portion of element 36
Element 18: resize to your liking --> place above element 80 --> position bottom left slightly off center of element 80
Element 45: resize to your liking --> place behind element 18 --> position to your liking (like the rose is sitting in the boot)
-Photoshop Elements13
-Font of choice (mine is Steamwreck so these settings work for my font. you may need to alter slightly for yours)
-layer --> layer style --> style settings
drop shadow: 30 deg angle; 4, 4, 75%; black
stroke: 2, 100, #634c46
font color: #d1b8bb
font color: #d1b8bb
Add copyright and watermark
Wednesday, September 7, 2016
Blog Makeover
New blog layout and new siggy :) Thought it needed a makeover since it's been awhile.
Wednesday, May 18, 2016
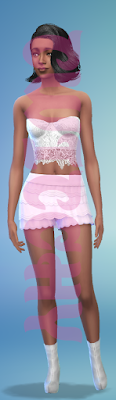
Sims 4 Studio Tutorial
Have trouble custom content (CC) in your sims game? I've been there all too many times. The worst part is not knowing which CC in your game it is. I downloaded Sims 4 Studio to make custom content for my game. I accidentally found out that it helps me identify trouble CC in my game from wrong category (having nude selected so it shows up in the shower) to meshes missing. For me, this was easier and quicker than trying one folder at a time in my mod folder. Let's get started with the tutorial.
 2. Skip over CC for building and buy modes.
3. When you first add new CC, go immediately in your game to check it.
4. Use the down and up arrow keys on the keyboard to go through the list faster.
5. Having CC in folders not only keeps the Mod folder organized, but makes finding issues faster.
6. If a mesh is missing then go back to the site you got your CC from and see if there's a link for a mesh. Sometimes it's easy to overlook it like I do sometimes
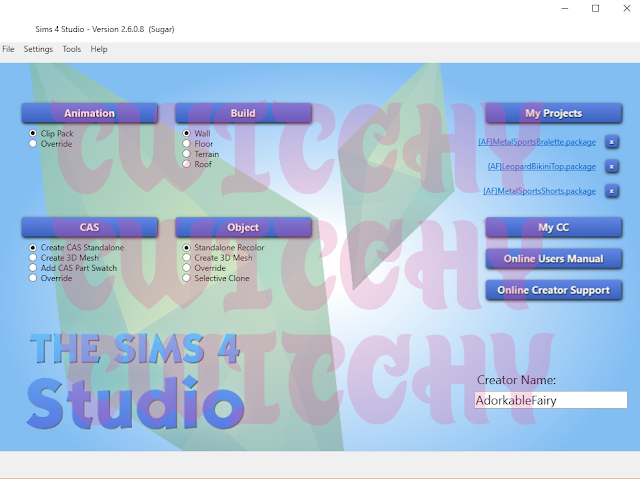

Program: Sims4Studio
Abbreviations:
CC = custom content
S4S = sims4studio
Tips:
1. If the mesh is not missing then you will see it on your sim and that will speed up the process of finding it in S4S.
3. When you first add new CC, go immediately in your game to check it.
4. Use the down and up arrow keys on the keyboard to go through the list faster.
5. Having CC in folders not only keeps the Mod folder organized, but makes finding issues faster.
6. If a mesh is missing then go back to the site you got your CC from and see if there's a link for a mesh. Sometimes it's easy to overlook it like I do sometimes
Tutorial
1. Download & install S4S
2. Go in your game and press C to take screenshots of your troubled CC.
3. Exit Sims 4
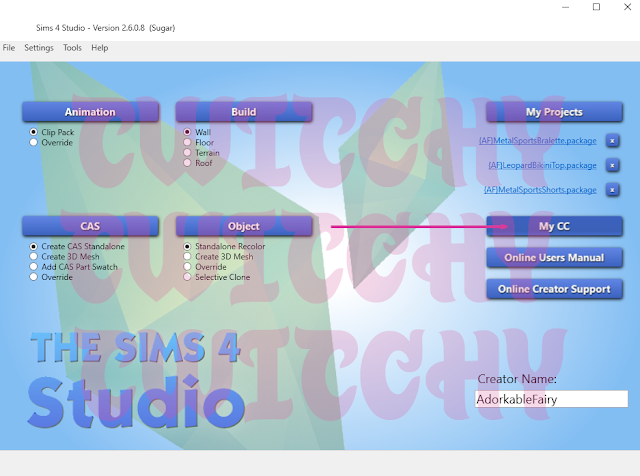
4. Launch S4S (this is what you will see minus my watermark)
5. Click the My CC
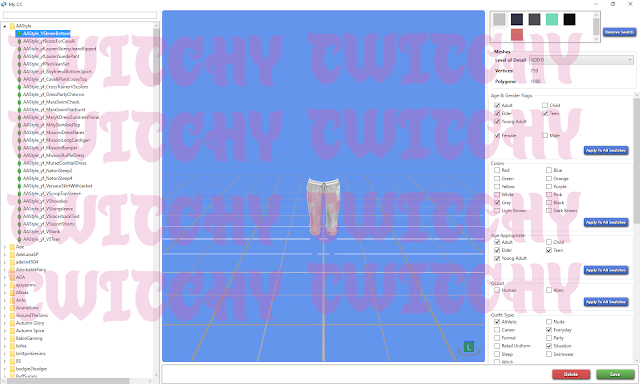
6. On the left is all of your CC. Mine is arranged in folders by CC creator, but yours may look different
7. Open the first folder (or click on the first CC file you have if you don't have folders)
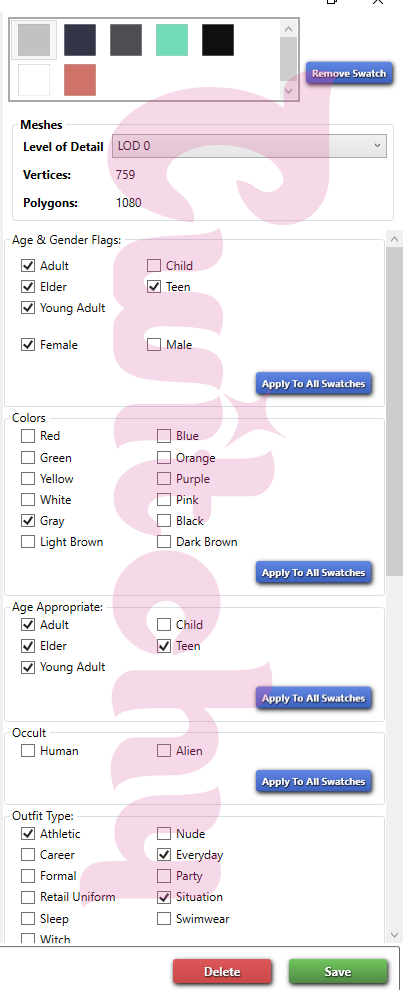
8. This is what you will see on the right side, which is what you will be editing. The only things that should be changed are: age and gender, colors, age appropriate, occult (if you want to allow aliens to wear it), and outfit type. The one I change the most is outfit type.
9. Now if a mesh is missing, this is what you will see - absolutely nothing lol.
(only having one folder in this SS was so I could find my problem file easier lol)
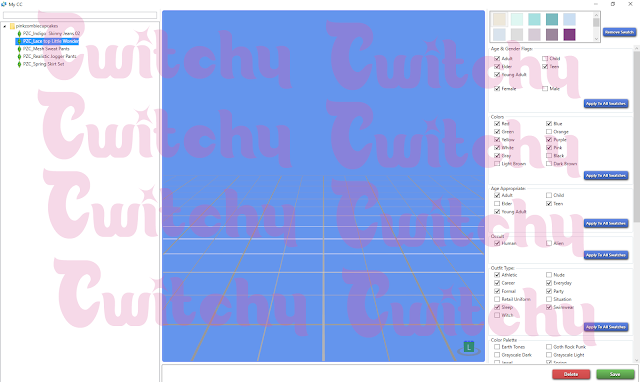
(only having one folder in this SS was so I could find my problem file easier lol)
Sunday, August 23, 2015
Monti's Scraps ~ Sunflowers

Supplies:
Program: Photoshop Elements 13 (other versions may work)
Tube of choice: Individual Tube 14-1 by Melissa Dawn. You must have a license to use her tubes.
PTU Kit: ScrapMonti_IB-MelissaDawn-14-1 by Monti's Scraps at Creative Design Outlet
Plugins: Eye Candy 5
Font: Sunflower
Open:
Paper7
Frame1
Element1
Element5
Element17
Element21
Element26
WordArt
Tube of choice
Tutorial:
Frame 1: Open
Paper7: Paste behind frame1 --> use rectanglular marquee tool --> draw a square --> ctrl+shift+i --> select the paper --> press delete
Element26: Open --> re-size 45% --> place on the left side of the frame --> duplicate --> move to the right side
Element1: Open --> re-size25% --> duplicate 4x --> place each copy in the 4 corners of the frame --> place the 2 at the bottom in front of element26
Element21: Open --> re-size 50% --> place on the left side of the frame behind element26 --> duplicate --> move to the right side
Element5: Open --> re-size 50% --> place behind frame in slightly off center
Element 17: Open --> re-size 50% --> place behind element5 to the left
Word Art: Open --> re-size 57% --> place on the top above the two sunflowers
Name:
-Photoshop Elements13
-Font of choice (mine is Sunflower so these settings work for my font. you may need to alter slightly for yours)
-layer --> layer style --> style settings
drop shadow: 30 deg angle; 6, 6, 75%; black
stroke: 2, 100, #5a2717
font color: #edb118
font color: #edb118
Add copyright and watermark
DONE
Monday, July 13, 2015
Mellie Beans ~ Medication
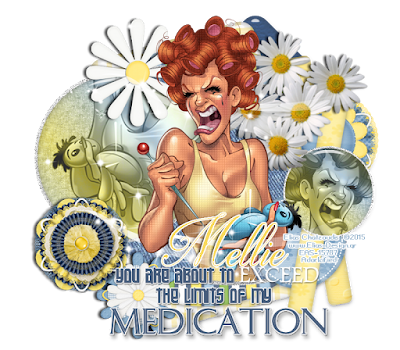
Supplies:
Program: Photoshop Elements 13 (other versions may work; PSP X5
Tube of choice: I Hate You by Elias. You must have a license to use his tubes.
PTU Kit: Daisies and Denim by MellieBeans at Mystical Scraps
Open:
Template 53 MedicationTutorial:
Template 53 Medication: delete credits
Creme rectangle: pp 14 --> re-size as needed --> select the magic wand tool --> click the rectangle --> ctrl+shift+i --> press delete on the paper layer
Plum rectangle: pp 13 --> re-size as needed --> select the magic wand tool --> click the rectangle --> ctrl+shift+i --> press delete on the paper layer
Purple circle: pp 20 --> rotate 90 deg right --> re-size as needed --> select the magic wand tool --> click the circle--> ctrl+shift+i --> press delete on the paper layer
White oval: filter --> noise --> add noise --> 50%, uniform, monochromatic --> click okay
White circle: filter --> noise --> add noise --> 50%, uniform, monochromatic --> click okay
Raster 2: filter --> noise --> add noise --> 50%, uniform, monochromatic --> click okay
Bottom tan strip: pp 12 --> re-size as needed --> select the magic wand tool --> click the tan strip --> ctrl+shift+i --> press delete on the paper layer
Top purple circle: don't do anything yet
Bottom purple circle: pp 11 --> re-size as needed --> select the magic wand tool --> click the circle --> ctrl+shift+i --> press delete on the paper layer
Top tan strip: pp 3 --> re-size as needed --> select the magic wand tool --> click the tan strip --> ctrl+shift+i --> press delete on the paper layer
Tube: re-size to your liking --> duplicate --> place original layer above the creme oval--> select the magic wand tool --> click the circle --> ctrl+shift+i --> press delete on the tube --> enhance --> autosharpen
Duplicate tube: select the elliptical marquee tool --> select portion of the bottom of your tube --> press delete
Creme oval: pp6 --> re-size as needed --> select the magic wand tool --> click the oval--> ctrl+shift+i --> press delete on the paper layer
Tube: Place closeup of tube above large tan circle --> position to your liking --> change from normal to luminosity
Large tan circle (PSP X5): open color palette --> select the eye dropper tool --> select the yellow --> switch background/foreground --> select the light blue next to the yellow --> select the gradient tool --> set settings to your liking (i used 45 deg repeats 4) --> fill circle with gradient --> select all --> float --> effects --> alien skin 5 textures --> select weave --> apply these settings -- click okay

Eye candy 5 Impact --> glass --> apply these settings --> click okay

Middle plum circle: do the same as for the large tan circle (including the tube)
e34: re-size to your liking --> place above large tan circle --> enhance --> auto sharpen
e23: re-size to your liking --> place behind top tan strip --> enhance --> auto sharpen
e13: re-size to your liking --> place above raster 2 --> enhance --> auto sharpen
e8: re-size to your liking --> place above e13 --> duplicate twice
e8 duplicate 1: crop duplicate so part of it is behind the tube --> enhance --> auto sharpen
e8 duplicate 2: move towards the top of the template behind the tube's head --> enhance --> auto sharpen
e3: re-size to your liking --> place behind e8 --> position so part of e8 is aligned with the white lace of e3--> enhance --> auto sharpen
e15: re-size to your liking --> place above bottom dotted circle --> enhance --> auto sharpen
Name:
-Photoshop Elements13
-Font of choice (mine is Darleston so these settings work for my fonts. you may need to alter slightly for yours)
-layer --> layer style --> style settings
drop shadow: 30 deg angle; 5, 5, 75%; black
stroke: 2, 100, #cda92d
font color: #0d9f41
font color: #0d9f41
Add copyright and watermark
DONE
Subscribe to:
Posts
(Atom)
My Blinkies